Checking and Adjusting Level Accuracy
- It is the responsibility of the user to follow operating instructions and to periodically check the accuracy of the laser and work as it progresses.
- The Rugby is adjusted to the defined accuracy specification at the factory. It is recommended to check the laser for accuracy upon receipt and periodically thereafter to ensure accuracy is maintained. If the laser requires adjustment, contact your nearest authorised service centre or adjust the laser using the procedures described in this chapter.
- Only enter the accuracy adjustment mode when you plan to change the accuracy. Accuracy adjustments should only be performed by a qualified individual that understands basic adjustment principles.
- It is recommended to perform this procedure with two people on a relatively flat
surface.
Checking the Level Accuracy
| Step | Description |
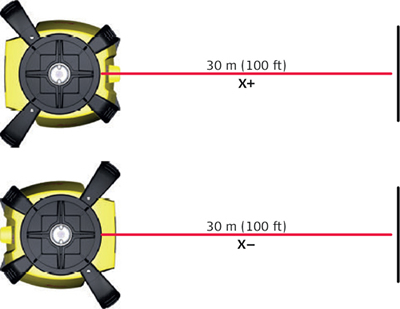
| 1 | Place the Rugby on a flat, level surface or tripod approximately 30 m (100 ft) from a wall. |
 |
|
| 2 | Align the first axis so that it is square to a wall. Allow the Rugby to self-level completely (approximately 1 minute after the Rugby begins to rotate). |
| 3 | Mark the position of the beam. |
| 4 | Rotate the laser 180° and allow it to self-level. |
| 5 | Mark the opposite side of the first axis. |
 |
|
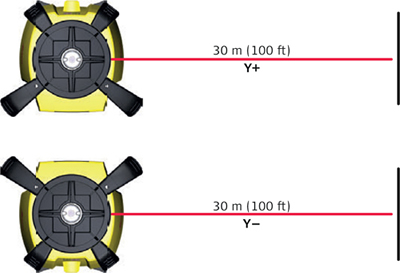
| 6 | Align the second axis of the Rugby by rotating it 90° so that this axis is square to the wall. Allow the Rugby to self-level completely. |
| 7 | Mark the position of the beam. |
| 8 | Rotate the laser 180° and allow it to self-level. |
| 9 | Mark the opposite side of the second axis. |
Adjusting the Level Accuracy
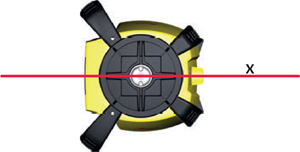
In Adjustment Mode the X-axis LED indicates changes to the X-axis.
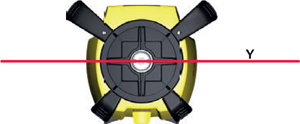
The Y-axis LED indicates changes to the Y-axis.
Entering adjustment mode step-by-step
| Step | Description |
| 1 | Turn off the power. |
| 2 | Press and hold both the Left and Right Arrow buttons. |
| 3 | Press the Power button. The active axis is the X-axis. |
The following sequence of LED behaviour occurs:
- The X-axis and the Y-axis LEDs flash alternately three times.
- The X-axis LED flashes three times, then flashes slowly until level. When the Rugby is level, the X-axis LED is on, but does not flash.
- The Y-axis LED is off.
Adjusting the X-axis step-by-step
| Step | Description |
| 1 | Press the Left and Right Arrow buttons to increment the laser beam up and down. Each increment is indicated by a flash of the X-axis LED and a beep from the audio indicator. |
| 2 | Continue to press the Left and Right Arrow buttons and monitor the spot until the Rugby is within its specified range. Five steps are equal to 10 arc seconds of change, or approximately 1.5 mm at 30 m (1/16" at 100’). |
| 3 | Press the Automatic/Manual Mode button to switch to the Y-axis. |
The following sequence of LED behaviour occurs:
- The X-axis and the Y-axis LEDs flash alternately three times.
- The Y-axis LED flashes three times, then flashes slowly until level. When the Rugby is level, the Y-axis LED is on, but does not flash.
- The X-axis LED is off.
Adjusting the Y-axis step-by-step
| Step | Description |
| 1 | Press the Left and Right Arrow buttons to increment the laser beam up and down. Each increment is indicated by a flash of the Y-axis LED and a beep from the audio indicator. |
| 2 | Continue to press the Left and Right Arrow buttons and monitor the spot until the Rugby is within its specified range. Five steps are equal to 10 arc seconds of change, or approximately 1.5 mm at 30 m (1/16" at 100’). |
| 3 | Press the Automatic/Manual Mode button to switch back to the X-axis if desired. |
Entering adjustment mode for the Z-axis step-by-step
| Step | Description |
| 1 | Turn off the power. |
| 2 | Place the Rugby in the laydown position. |
| 3 | With Power off, press and hold both the Left and Right Arrow buttons. |
| 4 | Press the Power button. The active axis is the Z-axis. |
The following sequence of LED behaviour occurs:
- The X-axis and the Y-axis LEDs flash alternately three times.
- The X-axis LED flashes three times, then flashes slowly until level. When the Rugby is level, the X-axis LED is on, but does not flash.
- The Y-axis LED is off.
Adjusting the Z-axis (vertical plane) step-by-step
| Step | Description |
| 1 | Press the Left and Right Arrow buttons to increment the laser beam’s vertical position. Each increment is indicated by a flash of the X-axis LED and a beep from the audio indicator. |
| 2 | Continue to press the Left and Right Arrow buttons and monitor the spot until the Rugby is within its specified range. |
Exiting adjustment mode step-by-step
Press and hold the Automatic/Manual Mode button for 3 seconds to save and exit Adjustment Mode. The X-axis LED and Y-axis LED flash alternately three times, then the Rugby shuts off.
Pressing the Power button at any time while in Adjustment Mode will exit the mode without saving changes.